How to resize an image without stretching or blurring it
Image tools · Published
Aspect ratio, pixel sizes and why making an image bigger rarely works, with practical steps for getting the size you need.
The short answer
To resize an image without stretching it, change only one side (the width, the height or the longest side) and let the other side follow automatically. Every resize tool calls this something like "keep proportions", "lock aspect ratio" or "scale proportionally". If you need an exact shape that doesn't match your image, crop first, then resize.
To avoid blur, make images smaller, not bigger. Shrinking keeps things sharp. Enlarging can't add detail that was never captured, so a small image blown up will always look soft.
Why images get stretched
Every image has an aspect ratio: its width compared with its height. A typical phone photo is 4:3 (for example 4000 × 3000 pixels), a widescreen video frame is 16:9, and a square is 1:1. If you type a new width and a new height that don't share the original ratio, the tool has to squash or stretch the picture to fill that box. Faces get wide or thin, and circles become ovals.
There are three honest ways to reach a different shape: fit the image inside the box (it stays in proportion, and one side comes out smaller than the box), crop it to the new shape first (you lose some of the edges), or pad it with a border. Stretching is the only option that distorts.
Pixels, file size and print size are different things
| What people call size | What it measures | How to change it |
|---|---|---|
| Pixel dimensions | How many dots wide and tall, e.g. 1600 × 1200 | Resize the image |
| File size | How much storage the file uses, e.g. 450 KB | Resize, compress, or change the format |
| Print size (DPI / PPI) | How large it prints: pixels divided by dots per inch | Change the DPI setting, or print at a different size |
When a form says "maximum 2 MB", that's file size. When it says "at least 600 × 600 pixels", that's pixel dimensions. Reducing the pixel dimensions usually shrinks the file too, but if you only need a smaller file, compressing may be enough and keeps the full resolution.
DPI (or PPI) only matters for printing. A 3000-pixel-wide photo printed at 300 DPI comes out 10 inches wide; at 150 DPI it would be 20 inches wide but less crisp. Changing the DPI number alone doesn't change the pixels on screen or in most uploads.
Why enlarging makes images blurry
A resize tool can only work with the pixels it has. When you make an image bigger, it invents in-between pixels by blending their neighbors, which softens edges and text. Some apps offer AI upscaling that guesses at new detail; results vary, and the guessed detail isn't really from your photo. If you need a larger image, the best fix is to find the original, higher-resolution file.
Resize with Filecon's image resizer
Filecon's image resizer works on JPG, PNG and WebP images in your browser, so your images aren't uploaded. It won't stretch an image unless you deliberately turn off proportions.
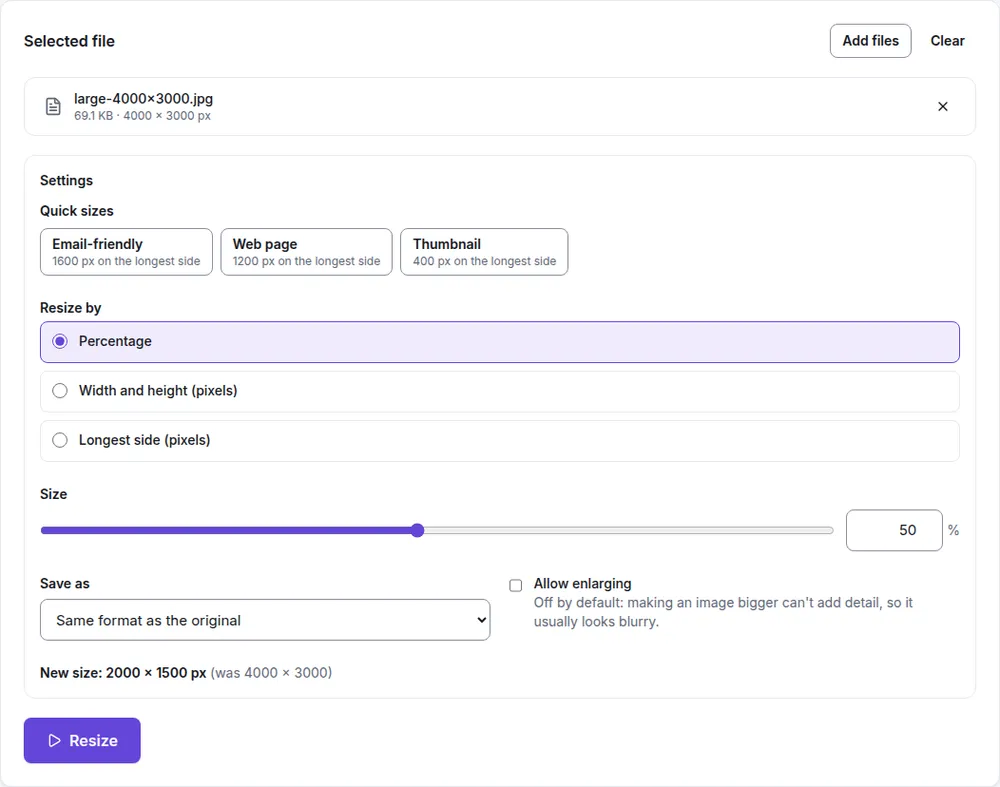
- Open the image resizer and add one image or several (up to 50 files, 20 MB each).
- Pick a Quick size: Email-friendly (1600 px on the longest side), Web page (1200 px) or Thumbnail (400 px). These are plain pixel sizes, not the requirements of any particular website.
- Or choose how to Resize by: Percentage, Width and height (pixels) or Longest side (pixels). With width and height, leave Keep proportions on: the image is fitted inside the size you enter, and you can leave one box blank to have it calculated.
- Check the New size line, which shows the result in pixels next to the original size, then select Resize and download.
Good to know:
- No enlarging by default. If a size is bigger than your image, it's kept at its original size, and the tool tells you. Tick Allow enlarging only if you accept a softer result.
- If you untick Keep proportions and enter both sides, you get that exact size, and the tool warns you that the proportions will change.
- Save as keeps the same format by default, or saves as JPG, PNG or WebP. Files are named with the new size, for example photo-1600x1200.jpg.
- HEIC photos aren't accepted here. Convert them with HEIC to JPG first.
If your goal is a smaller file rather than fewer pixels, try the image compressor. It keeps the same pixel dimensions, shows the original and compressed sizes side by side, and gives you the original back if it can't make it smaller.
Resize with built-in apps
Windows: Photos or Paint
- Open the image in the Photos app.
- Open the … (See more) menu and choose Resize image. The layout differs between Photos versions.
- Enter the new size in pixels or as a percentage, and save it as a copy.
Paint also works: its resize command (Ctrl + W) opens a Resize and Skew dialog with percentage or pixels and a Maintain aspect ratio checkbox. Use Save as so you keep the original.
Mac: Preview
- Open the image in Preview.
- Choose Tools › Adjust Size (or click the Markup toolbar button, then Adjust Size).
- Make sure Scale proportionally is selected, then enter a new width or height, pick a preset from Fit into, or switch the unit to percent.
- Keep Resample image selected if you want fewer pixels. Turning it off changes only the print size (resolution), not the pixel count.
- Click OK, then use File › Export if you want to keep the original unchanged.
iPhone and iPad
The Photos app can crop and change the aspect ratio, but it has no option to resize to a specific pixel size. Two free workarounds:
- Shortcuts: Apple's Shortcuts app includes a Resize Image action. A simple shortcut that takes photos from the share sheet, resizes them to the width you choose and saves them back works well for repeated use.
- Your browser: Filecon's resizer also works in Safari on iPhone and iPad.
Android
It depends on your phone. Google Photos can crop to an aspect ratio and save a copy, but it doesn't resize to a pixel size. Some manufacturers' gallery apps include a resize option in their editor, so look there first. Otherwise, a browser tool works on any Android phone.
Troubleshooting
The resized image is still too large to upload
Check which limit you're hitting. If it's file size, save as JPG or WebP, or compress it. PNG photos are often large even at modest pixel sizes.
The site needs an exact size, like 1080 × 1080
Crop to the right shape first (1:1 for a square), then resize. Resizing a 4:3 photo straight to a square box either stretches it or leaves one side short.
The image turned sideways
Phone photos often store their rotation as a separate tag. Filecon applies it, so the output is upright. Some older apps ignore it, which can make the same photo look sideways there.
In short
Lock the proportions, change one side, and only make images smaller. Use pixel dimensions when a site asks for a size in pixels, and compression when it asks for a file size. Crop first if you need a different shape, and keep the original.